How to create a personal website easily
How to create a personal website easily
Why Should You Have a Personal Website?
Before diving into the how-to, let’s talk about why having a personal website is so beneficial:
-
Control Your Online Presence: Social media platforms and third-party sites are great, but they don’t always give you the full control over your personal brand. With a website, you dictate how you want to be seen by potential employers, clients, collaborators, or followers.
-
Stand Out from the Crowd: A personal website is a great way to showcase your unique skills, experience, and work in a professional way. It adds an extra level of credibility and can help you stand out in a competitive field.
-
Build Trust and Credibility: Having a polished website with testimonials, portfolios, and a professional design can give visitors confidence in your expertise. It’s a powerful tool for establishing trust.
-
SEO Benefits: Having your own website allows you to be found on search engines like Google. Whether you’re a freelancer looking for clients or someone with a creative side hustle, a website increases your discoverability.
-
Flexibility: You can easily update and change your content, portfolio, or resume, making your website an always-current reflection of who you are and what you do.
Now that you understand the importance of a personal website, let’s look at how you can create one quickly and easily with Create Personal Website.
Step 1: Choose Your Domain Name
Your domain name is your website’s address on the internet. It’s the first thing people will see when they visit your site, so choosing a memorable and professional domain is crucial.
-
Keep it short and memorable: Ideally, your domain name should be your name (e.g., www.YourName.com)
-
or something related to your profession. Avoid using numbers or special characters if possible.
-
Pick the right extension: While .com is the most common and trusted domain extension, you can also consider alternatives like .co, .me, or .design based on your niche.
Once you’ve chosen a domain name, you can easily purchase it directly through Create Personal Website, making the process seamless.
Step 2: Select a Template or Design
If you’re not a web designer, don’t worry—Create Personal Website offers a variety of pre-designed templates that you can customize to fit your personal style and brand. The templates are mobile-responsive, modern, and designed with the user experience in mind.
-
Choose a Template That Matches Your Brand: Whether you’re looking for something minimalist, creative, or professional, you’ll find a template that reflects your style. Each template is fully customizable, so you can change colors, fonts, images, and layout to match your vision.
-
Drag-and-Drop Builder: No coding experience? No problem! Our drag-and-drop website builder allows you to design your website by simply dragging elements into place. This makes the process of creating your personal website easy and fun.
-
Preview Your Design: You can view your changes in real-time, which helps you see exactly how your website will look when it’s live.
Step 3: Add Essential Content
Once you’ve chosen a template and customized the design to your liking, it’s time to start adding content to your website. Depending on your goals, your personal website should include a few key sections:
-
Home Page: This is the first impression visitors will have of you. Keep it simple but engaging. Include a brief introduction of who you are, what you do, and a call to action (CTA) to guide visitors to other parts of your site (e.g., “Learn More,” “View My Work”).
-
About Me: This section is where you tell your story—who you are, what you do, and why you do it. Share your background, values, and personality to give visitors a sense of who you are.
-
Portfolio or Work Samples: Showcase your best work here. Whether you’re a writer, designer, photographer, or developer, create a portfolio that highlights your skills and accomplishments. You can easily upload images, videos, or links to your work.
-
Resume/CV: If you’re using the website to get hired, make sure to include an updated resume or CV that outlines your skills, experience, education, and certifications. Include downloadable PDF options for convenience.
-
Contact Page: Make it easy for visitors to get in touch with you. Include a simple contact form, your email address, and links to your social media profiles. You can even add a location if relevant (e.g., for local services).
-
Blog (Optional): If you have insights to share, consider starting a blog section. This is a great way to showcase your expertise, share knowledge, and keep your website fresh with new content.
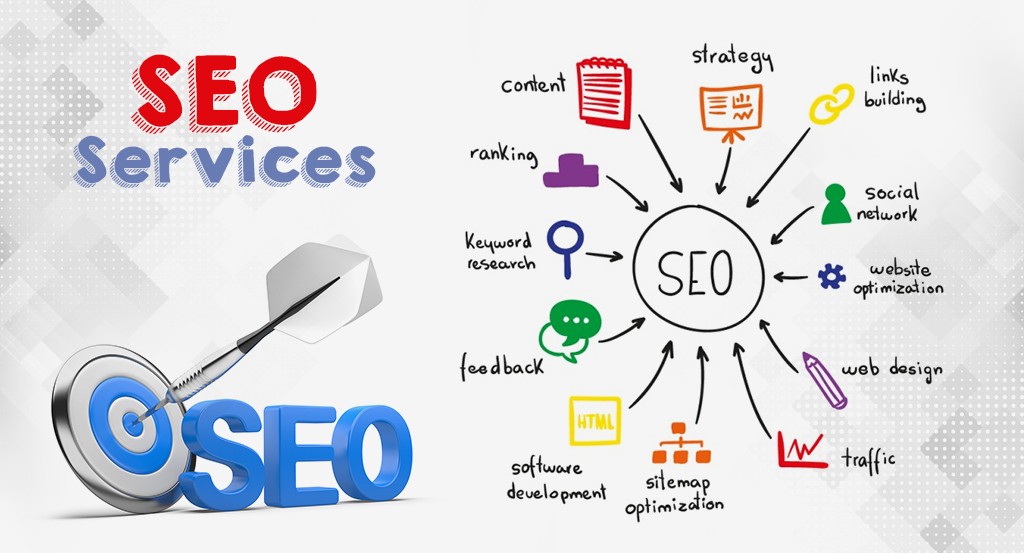
Step 4: Optimize for SEO
A great-looking website is only effective if people can find it. Search engine optimization (SEO) helps you improve your website’s visibility on search engines like Google. With Create Personal Website, you don’t need to be an SEO expert to get started:
-
Meta Tags: Easily add titles, descriptions, and keywords to each page for better SEO.
-
Image Optimization: Add alt text to your images to improve visibility and make them accessible.
-
SEO-Friendly URL Structure: Our platform automatically creates SEO-friendly URLs for each page, making it easier for search engines to crawl and index your site.
By optimizing your website for search engines, you’ll increase your chances of being discovered by potential employers, clients, or collaborators.
Step 5: Publish and Promote Your Website
Once your website is designed, the content is added, and the SEO is optimized, it’s time to hit publish! With Create Personal Website, publishing is a one-click process.
-
Social Media Integration: Link your social media profiles to your personal website, allowing visitors to easily connect with you on other platforms.
-
Share Your Website: Share your new website with friends, family, and colleagues. Promote it on social media, in your email signature, and on business cards.
-
Track Your Visitors: Once your website is live, you can use built-in analytics tools to track your visitors, see how they’re interacting with your site, and adjust your content to maximize engagement.
Step 6: Maintain and Update Your Website
The work doesn’t stop once your site is live. Regularly updating your website with new content, portfolio pieces, and information helps keep your site relevant and engaging.
-
Add New Projects: Keep your portfolio up-to-date by adding new work.
-
Blog Posts: If you have a blog, try posting regularly to keep your website fresh and encourage repeat visitors.
-
Check Analytics: Use the data from your analytics tools to learn what’s working on your website and make improvements over time.
-
Recent Posts

Mobile-friendly personal websites

Modern responsive website design

Affordable custom web design packages

Website design with SEO optimization
How to create a personal website easily